Time for another challenge at Exploring Cricut. You are to create a card, layout or papercraft using a Cricut machine and cartridges. You can create any project celebrating Easter. I made a two page layout using many cartridges. I am happy how it turned out and will use it on my granddaughter Mary-Kate's album. Enter your challenge by Saturday, March 30 at 10 pm eastern time. Below are my cartridges and cuts .
Paper Doll Dressup
Grass cut at 1.5 inches page 78 tabs shift wagon cut ayt 6.75 inches page 36 accessories 3 removed handle and ran through wood grain folder from Hobby Lobby
George and Basic Shapes
circle cut at 1 inch for wheel
Everyday Paper Dolls
Doll cut blackout at 5 inches, face stamped with Peachy Keen stamps Outfit page 67 cut at 5 inches
Hair page 47 cut at 5 inches
Simply Charmed
Chick and Egg page 35 cut at 2.25 inches
Bunny with Carrot page 35 cut at 2.5 inches
Doodlecharms
Easter basket and eggs cut at 2 inches page 89 and ran through Charles cuttlebug folder
Easter 2010
grass cut at 1.5 inches
bunny cut at 2.25 inches
Happy Easter cut at 3 inches
Materials
cardstock
stickles
ribbon
Showing posts with label Paper Dolls Dressup. Show all posts
Monday, March 25, 2013
Monday, December 17, 2012
Exploring Cricut New Challenge
Its been a while since I have posted. Been busy with Christmas shopping, making things for my granddaughters bazaar and a freak accident with my foot. Lets just say if your foots asleep, just roll over and go back to sleep till you both wake up! lol Today we have a new challenge at Exploring Cricut. You are to make a card, layout or papercraft of your favorite Christmas activity, trip, traditions, or favorite memory or anything connected with the "Most Wonderful Time of the Year". Link your post by Saturday, December 22. I made a two page layout using the cartridges A Quilted Christmas, Paper Doll Dress Up, and Teresa Collins December 25. Below are the details and materials. I can't wait to see what you create!
Materials: Pattern Paper Simple Stories Handmade HolidayCardstock American Crafts
Stickles
Cartridges A Quilted Christmas-page 76 package border cut at 2..25 inches
page 32 Santa3 cut at 4.5 inches
Paper Doll Dress Up-page 73 Acessories 3 Tree cut at 5.5 inches
Teresa Collins Dec. 25-Dec. 25 cut at 4 inches
Snowflake swirls cut at 2 inches
Friday, October 12, 2012
Welcome to the Monster Mash Blog Hop, brought to you by the design teams of Made Especially For You and Exploring Cricut!
Today the design teams of Made Especially For You and Exploring Cricut have teamed up to share with you all sorts of spooktacular monster-themed projects to help get your crafty gears turning for all those upcoming Halloween projects!
If you've come from Ashley's blog http://.especiallymade.blogspot.com
you're in the right place! If you just came across the hop and would like to start at the beginning, please visit Ashley at Made Especially For You.
For my project, I created a two page layout using the cartridges Happy Hauntings, Mini Monsters and Paper Doll Dress Up and Camp Out. Here is a materials and sizes I used to cut my project.
Happy Hauntings-title cut at 1.5 inches Spooky Font
witch cut at 3 inches
haunted house at 5 inches
grass cut ayt 2.25 and 3.25 inches
graveyard cut at 2.25 inches
ghost cut at 1.5 inches
mummy at 3.5 inches
Mini Monsters-all monsters cut at 2.5 inches
tree cut at 5 inches
do not enter sign cut at 4.5 inches
Paper Doll Dress Up-road cut at 1.5 inches and welded 3 together
bats cut at 3 inches
Camp Out-Full moon cut at 4 inches
Pattern Paper-Bo Bunny, Recollections cardstock and stickles
Paper Piecings by Nikki
$15 Gift Certificate
$10 Gift Certificate
The winners of the blog candy will be announced on Made Especially For You on Tuesday October 16th. Please make sure to leave your contact information when commenting to be eligible to win!
Your next stop is Jessica's blog at http://craftinandstampin.blogspot.com
Here's the complete lineup in case you get lost along the way:
Ashley - http://especiallymade.blogspot.com
Sharon - http://meemeescreations.blogspot.com
Georgiana - http://carsonscricutcreations. blogspot.com
Cyndy - http://arcyscraps.blogspot.com
Diana - http://craftypeepdb.blogspot. com
Eileen - http://scrappingactuary.blogspot.com
Kim - http://littleredshood.
Annette - http://mymindsdustbunnies. blogspot.com
Michelle - http://mumoftwoblog.blogspot. com
Happy Hopping!
Labels:
Camp Out,
Happy Hauntings,
Mini Monsters,
Paper Dolls Dressup
Monday, September 10, 2012
Exploring Cricut Challenge
Welcome to another challenge at Exploring Cricut. The challenge today is a fun one. I have been a little out of the loop this week with a death in the family and being out of town and seems like the week got away. So glad to be back to crafting and blogging. Now lets talk about the challenge! You can create a card, layout or papercraft of any theme or color, but must include a person (man, woman, boy, girl) Many of the cartridges have characters so you can have fun exploring! Link your project by Saturday, Sept. 15 9 pm eastern time. Have fun and join us this week! I have created a two page layout using the cartridges Martha Stewart Seasonal Cake Art, October 31, Create a Critter, Paper Doll Dress Up and Cricut Font and Basic Shapes. Below the picture are my cut measurements and materials.
Martha Stewart Seasonal Cake Art- Leaf border shadow cut at 1.25 inches 3 of them and welded together in gypsy.
Cut 3 of the top borders in different papers and just cut the leaves off and glued on the shadow border.
October 31-Pumpkin patch sign cut at 4 inches
Create a Critter-grass cut at 1.25 2 pieces and welded together in gypsy did two of them
Paper Doll Dress Up-pumpkins cut at 4.5 inches
Girl cut at 5.5 inches
leaves cut at 2.5 inches
Cricut Font and Basic Shapes-2012 cut at 1.25 inches
We R Memory Fall stack for pattern papers
cardstock Bazzill and Recollections
Cut 3 of the top borders in different papers and just cut the leaves off and glued on the shadow border.
October 31-Pumpkin patch sign cut at 4 inches
Create a Critter-grass cut at 1.25 2 pieces and welded together in gypsy did two of them
Paper Doll Dress Up-pumpkins cut at 4.5 inches
Girl cut at 5.5 inches
leaves cut at 2.5 inches
Cricut Font and Basic Shapes-2012 cut at 1.25 inches
We R Memory Fall stack for pattern papers
cardstock Bazzill and Recollections
Tuesday, August 14, 2012
Tueday Daily Project Exploring Cricut
Today I have the daily project at Exploring Cricut. I created this two page layout using the cartridges Mini Monsters, Paper Doll Dress Up and Cricut Alphabet. I am trying to get my granddaughter Peyton's 2010 album finished and at Halloween! Can you say way behind!!! Below the pictures are the details and measurements. Be sure to enter our challenge too. Just created any cricut project you want that includes at least 2 cricut cuts and 1 monogram. Can't wait to see what you do!

Cardstock Recollections
Stickles
Paper Doll Dress Up- Trick or Treat bag cut at 3.75 inches
Cricut Alphabet-title cut at 1.5 inches
Mini Monsters- candy pieces cut at 2 and 2.75 inches
suckers cut at 3.5 inches
Tuesday, July 17, 2012
Tuesday Daily Project Exploring Cricut
Hope you all have been enjoying our blog hop this week at Exploring Cricut! If you missed it, go to the sidebar on the blog and click where it says new challenge and it will take you to the post. Most of our DT will be giving something away this week too! Now for the Tuesday daily project. I am going along with the theme of Christmas in July and created ornaments using old cds. I always save those that come in the mail or any bad ones to use for craft projects. I am showing pictures of how I did this. I used the cartridges Very Merry Tags, Winter Frolic, Winter Woodland and Paper Doll Dressup for my cuts. Below the pictures are the measurements. Be sure to enter our "Christmas in July" challenge this week.


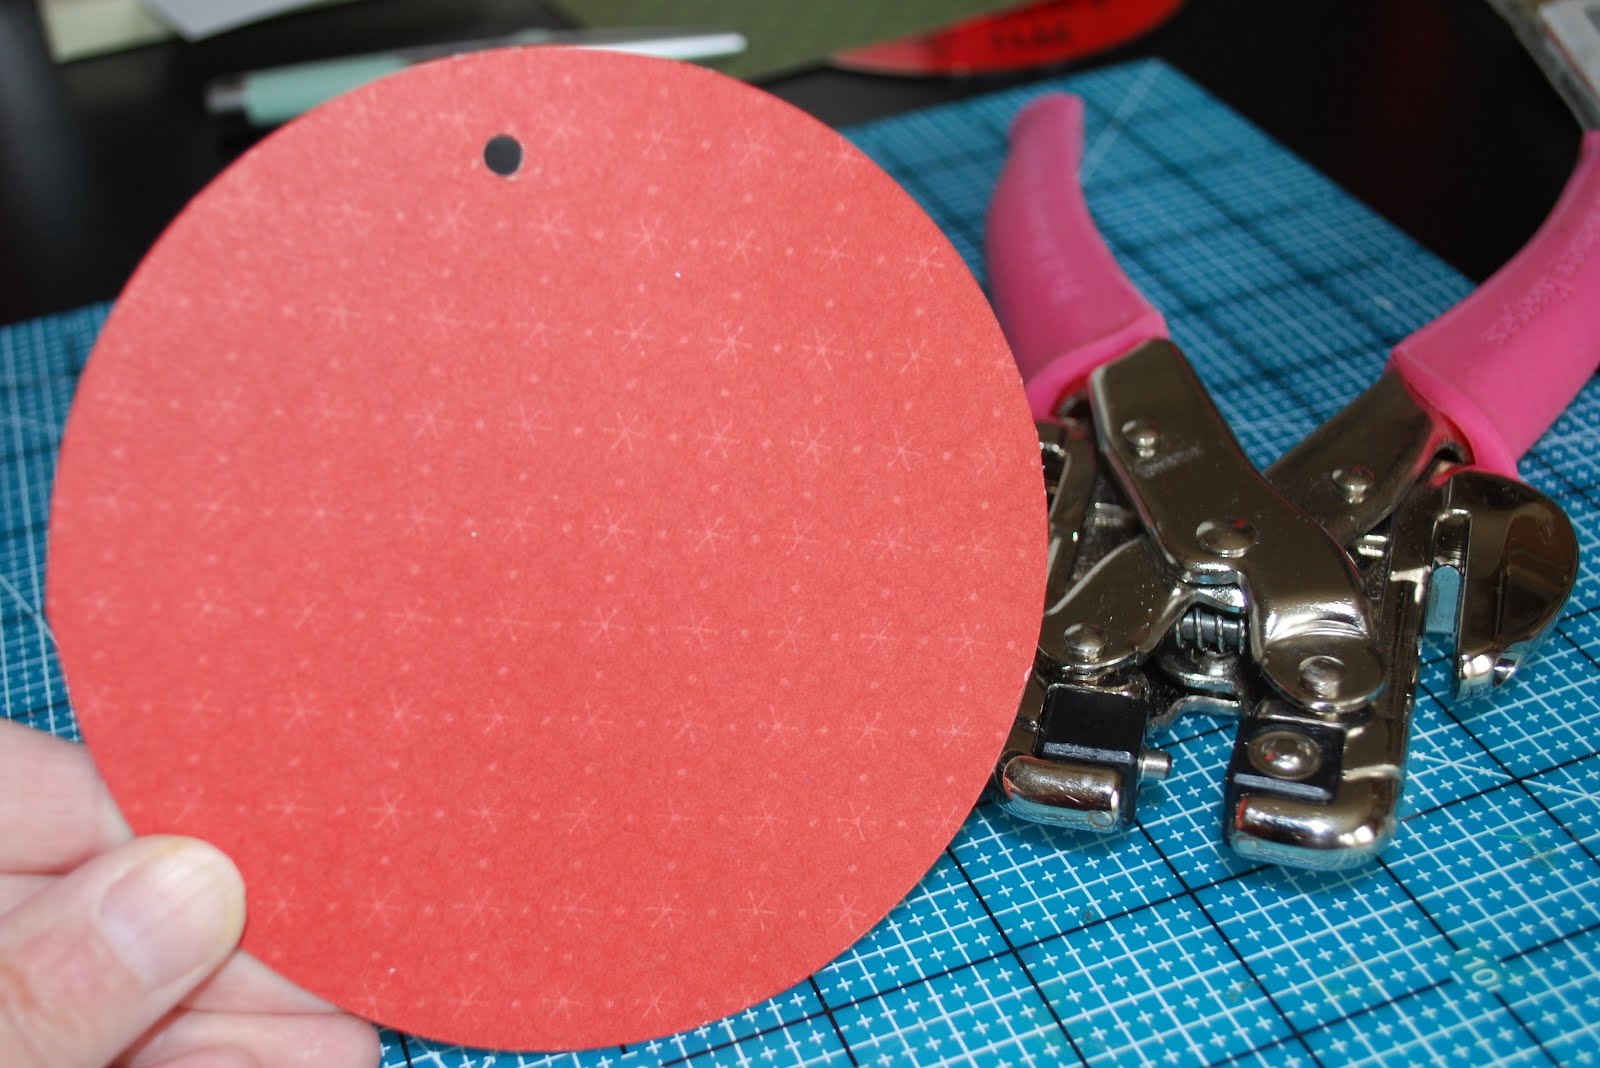
Just start with some old cds, using you get some in the mail or have some old ones.
I covered mine with scor tape because it holds so well and works great to hold the paper.
Smooth out paper and trim around the edges with scissors or a craft knife.
I just punched a hole with my crop-a-dial.....that is one awesome tool for sure! Now you are ready to decorate however you like! I have added pictures before too. Now for my sizes
Very Merry Tags-shadow snowflake cut at 4.5 inces
Very Merry Tags- top snowflake cut at 4 inches
Winter Frolic-snowman cut at 4 inches
Winter Woodland-Poinsettia cut at 4 inches. I cut 2 of the flower part.
Paper Doll Dress Up-Tree cut at 4.25 inches
I also used scrap papers, jewels, stickles, and liquid pearls
Monday, April 23, 2012
New and fun challenge at Exploring Cricut this week!
We are having a great challenge starting today at Exploring Cricut. The challenge is called "It's a Box" You are to make a box, bag, purse, any shaped container you want from your cricut cartridges. With all the great cartridges we have with the party favors and treat boxes, I am sure you will find something you will want to do! I decided on making the Dog House treat box from the new Tags, Bags, Boxes and More 2 cartridge. The box just took on its own charm once I got started on it. I used Old West for wood planks for the roof to jazz it up, Animal Kingdom for the Dog, Everyday Paper Dolls for the grass, Paper Doll Dress Up for the bone and to decorate around the dog house, tulips from Spring Cottage. Below the picture I will put the measurements for each cut. I can't wait to see your creation!
Dog House cut at 7.5 inches-Tags, Bags, Boxes, and More 2
Wood planks cut at 2 inches and 2 1/4 inches-Old West
Dog cut at 2 inches-Animal Kingdom
Grass cut at 1 inch-Everyday Paper Dolls
Bone cut at 2 inches-Paper Doll Dress Up
Tulips cut at 1 inch-Spring Cottage
Dog House cut at 7.5 inches-Tags, Bags, Boxes, and More 2
Wood planks cut at 2 inches and 2 1/4 inches-Old West
Dog cut at 2 inches-Animal Kingdom
Grass cut at 1 inch-Everyday Paper Dolls
Bone cut at 2 inches-Paper Doll Dress Up
Tulips cut at 1 inch-Spring Cottage
Friday, November 18, 2011
Papercutz Challenge
It's time for another challenge at PaperCutz. This challenge is called, "Let's Talk Turkey". You are to make a card, layout, or papercraft using a stamped, digital, or Cricut cut image of a turkey. Use any colors you like. I decided on making a wreath with my turkey. I used the cartridges Paper Dolls Dressup and Simply Charmed for my project. Below are directions. Hope you enjoy and stop over and check out the other DT members projects.
Directions:
I used assorted patterns of Fall papers from a DCWV stack that I had along with cardstock scraps. This was made of entirely scraps from my stash.
Pinwheels-cut strips from 1 to 3 inches, scored and put together in circle. I used hot glue to secure them.
Turkey cut @ 8 inches-Simply Charmed
Leaves -cut @ 2 inches-Paper Dolls Dressup
Happy Thanksgiving-cut @ 3.25 inches-Simply Charmed
I used assorted patterns of Fall papers from a DCWV stack that I had along with cardstock scraps. This was made of entirely scraps from my stash.
Pinwheels-cut strips from 1 to 3 inches, scored and put together in circle. I used hot glue to secure them.
Turkey cut @ 8 inches-Simply Charmed
Leaves -cut @ 2 inches-Paper Dolls Dressup
Happy Thanksgiving-cut @ 3.25 inches-Simply Charmed
Subscribe to:
Posts (Atom)